Tags

Tutorial Coming Soom by Popular Demand!

28 Friday Jun 2013
Posted in Hair Stuff, Natural Hair
Tags
Tutorial Coming Soom by Popular Demand!
24 Wednesday Apr 2013
Posted in Effortless Style, Hair Stuff, Natural Hair, Style
Tags
CurlPlease, easy, Hair, How To, Natural Hair, Style, Twists
Hey Everybody! Yes, I am still living. I have so much to update you all on but that is a totally separate post on its own. I went out-of-town about a month ago and I had business dinner to attend, but I had twists. I didn’t want to look unfinished so I tried a pin curl style on a whim. It turned out beautifully.
I started with regular medium-sized two strand twists that I had done previously. I made an off-center part in the front and using the twists in the front, I made two 2-3 inch sections on the right and one section on the left.
In the back, I made about 3-4 big sections. Holding the sections of the twists flat to my scalp, I used my other hand to circle the twists around the center and base, keeping them as flat as possible to my head and pining them down every 1-2 inches until I got to the ends of the twists. I pinned the sections in the front slightly toward to my face to make a small bang.
I repeated the process for all of the sections. As I mentioned before, the style was on a whim so I don’t have any pictures of the back.


Thanks for stopping by!
Lina
11 Monday Mar 2013
Posted in Hair Routine, Hair Stuff, Natural Hair, Style
Tags
Curl Wand, CurlPlease, Curls, easy, Hair, How To, Jilbere, Love, Natural Hair, Products, Style, Tips
I recently purchased a Jilbere Curl Wand from Sally’s Beauty Supply. I picked it up for about $55. I chose Jilbere over any other brand because of the good results I’ve had using my 1″ and 1/2″ wide flat irons that I own by Jilbere. It was kind of awkward finding the best position for my hands to hold the wand, but around the 3rd or 4th curl, I had a nice routine going. I started by washing and conditioning my hair. Then I let it dry about 85% using a cotton T-Shirt wrapped around my hair like a turban. I took the turban off, sectioned my hair into 4 quadrants, sprayed each section generously with Aveda Brilliant Damage Control Spray and clamped them into place. 
Before blow drying each section, I applied a quarter sized amount of grapeseed oil from root to end. Grapeseed oil is a natural heat protectant with a high smoke point of around 400 degrees. I made sure to be thorough with my blow drying so that the curls would be as smooth as possible and would require less direct heat contact with the wand.

The Curl Wand also came with this really neat glove to protect your fingers from the hot curling wand. I opted to go with out the glove because it hindered my grip on the hair and I didn’t like it.

First, I took 1″ sections of hair and sprayed the 1″ section generously with medium hold hair spray.
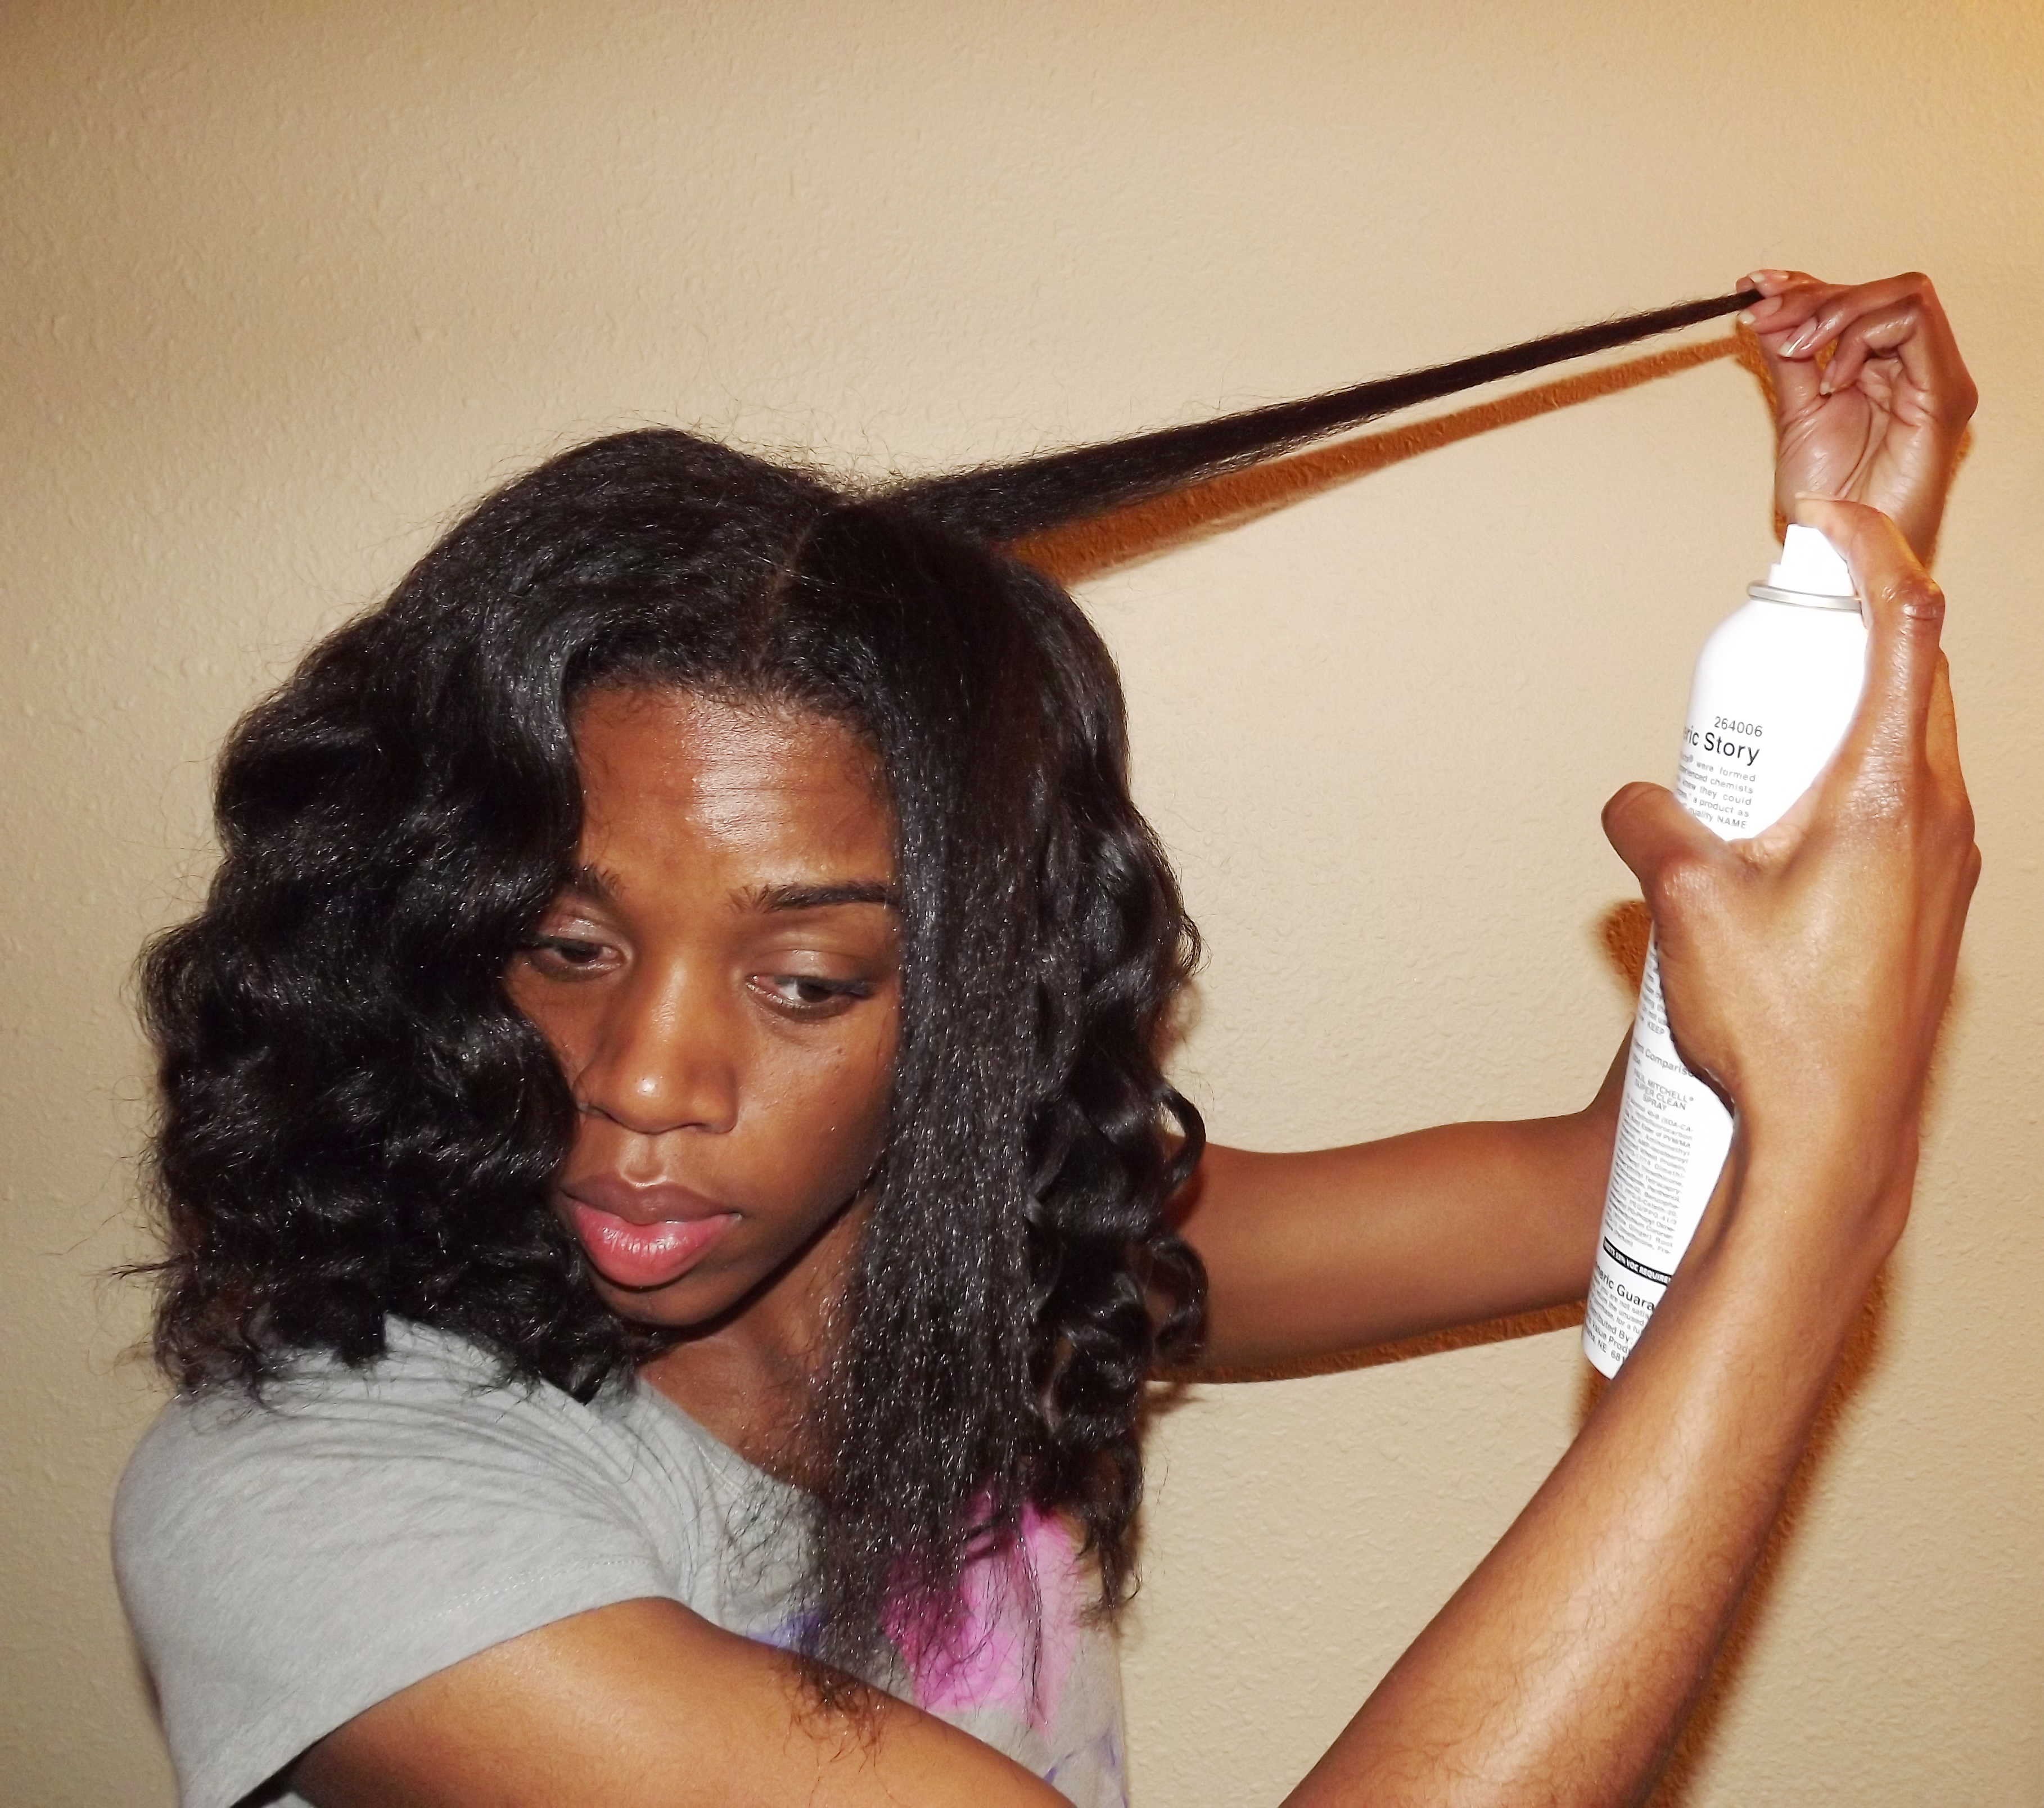
To curl the section, grab the center of the length of the hair firmly, position the curling wand base (the wide end) at the base in front of the section of hair and wrap your hair forward and under around the wand until you reach the end of your hair. Then, hold the end of your hair tought around the end of the wand and count to ten.

 Release the hair from the wand and Voila!! Gorgeous curls abound!


I’m soooooo happy I purchased this wand!!! It did a great job! This style is perfect for special occasions and doesn’t take long to do at all. It’s also an easy style to touch up. The only con is that, if you don’t flat-iron your hair before using the wand, the style won’t last long. However, flat ironing before “curl wanding” takes away the body and volume. Either way, I love this style! This is great date, wedding, and any occasion hair! Two thumbs up!
TIPS!
Enjoy!
Lina
21 Monday Jan 2013
Posted in Effortless Style, Hair Routine, Hair Stuff, Natural Hair
Tags
CurlPlease, Curls, easy, Hair, Natural Hair, Roller Set, Shampoo, Style, Tips
One Friday as I sat on my couch lurking on Youtube, I came across a tutorial on a rollerset using the ponytail method. After watching a few more, I decided to give it a try. I was truly surprised at the results. Because of the ponytails, I was able to install my rollers in half the time that it takes me to do a traditional roller set. The set looked so smooth and dried fast (Hooray!) and I loved it. This is a good method to have in your arsenal.
Here’s what you’ll need:
24-30 Bouffant rollers (I used the snap on type), Foam wrap, a wide tooth rat-tail comb, narrow tooth rat-tail comb, a spray bottle filled with water (to re-wet hair if needed), scissors, Rubber bands, Two hair roller hair nets, and an electric hot comb.
I started with washed and deep conditioned hair. Then I sectioned my wet (but not dripping) hair into three sections ear to ear front, crown and back. I each section make 2 inch by 2 inch pony tails such small rubber bands. I used rubber bands because the small cotton scrunchies would 1. cover up too much of my hair at the base and it wouldn’t get dry and 2. You would have to slide them down your hair to get them off and I don’t like the thought of possibly ruining my curl.
Note: In order for this method to work and your roots to be smooth, the pony tails must me pulled firmly, not painfully tight, but snug so that the rubber bands don’t slide and so the roots will be straight.
For Each sectioned ponytail, apply foam wrapping lotion to the entire ponytail, split the hair in two, detangle with a wide tooth rat-tail comb, and smooth the ends with a narrow tooth rat-tail comb and install a roller.
Note: Each sectioned and split ponytail should have 2 rollers.


Continue rolling until your ponytails are all rolled…


Put a hair net over your rollers to hold them firmly into place and keep them from hanging and sliding. I needed two, because my rollers were kind of big.


I sat under a hooded dryer for 2 hours, and then kept the rollers in for a while as I watched TV (and because I fell asleep :-)). You can also let them air dry if you prefer no heat.
After checking a few for complete dryness in each section, I removed all of the rollers.


Starting with the back sections, I used pair hair scissors and cut the rubber bands from each ponytail, being carefull not to cut my hair. After removing the rubber band from a section, I touched up the area (the roots) where the rubber bands had made a crease with an electric hot comb to smooth it out.


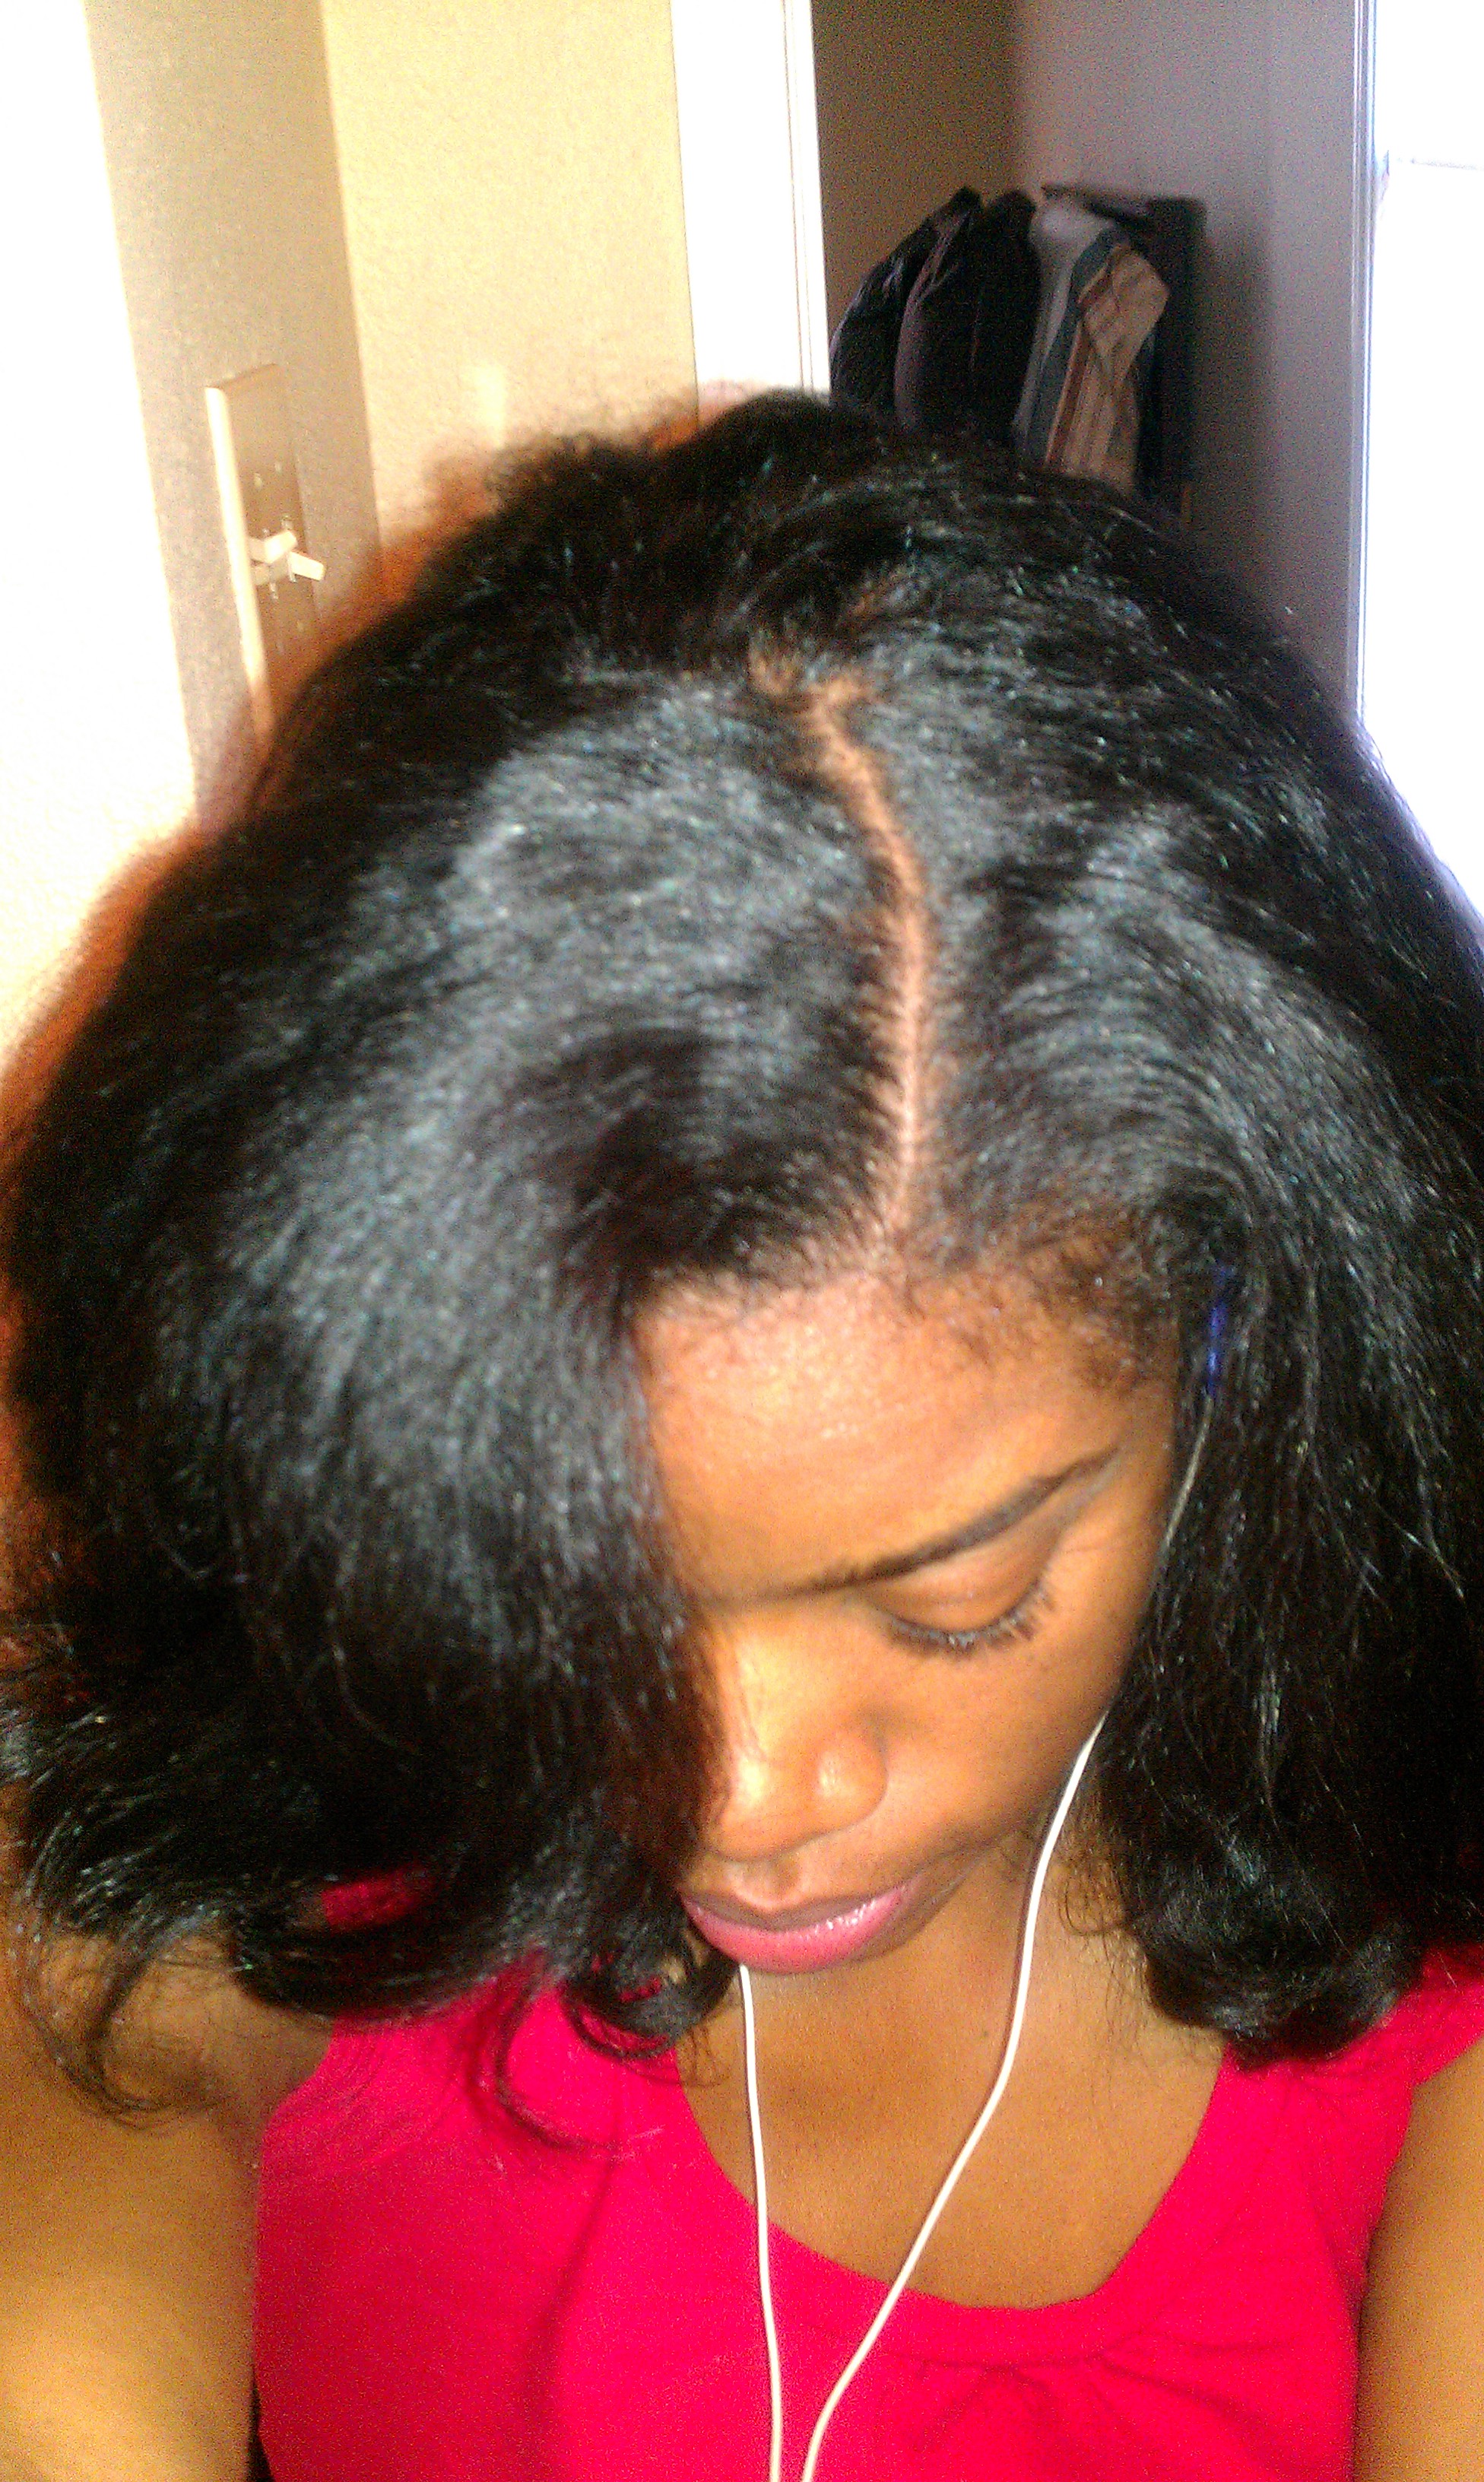


Setting the hair with the roots pulled taut really helps achieve the coveted smoothness that makes roller sets look so wonderful. I really like this method, and it really stands a chance to replace the traditional mohawk rollerset.
Try it! Enjoy!
Lina
02 Wednesday Jan 2013
Posted in Hair Routine, Hair Stuff, Natural Hair
Tags
CurlPlease, easy, Hair, Natural Hair, Style, Tips, Twists
I’ve been rocking two strand twists and I came up with these two cute and work appropriate styles.
Two French Braids with a side bun:
To do this simple style, make and off-center part at the top of your head. Braid a large french braid going across the front of your head to the right side. Take the rest of the twists and make a french braid going from the left ear around the back to the right side of your head. Gather the ends of the two french braids and make a bun. Secure the bun with Bobbie pins.


Swooped Bang with a Pony:
To do this style, simply separate a section of hair in the front of your head. Grab the ends and swoop them across you forehead to above your ear and secure the ends with a Bobbie pin. Gather the rest of the twist into a pony tail with an elastic band.


Piece of Cake!!!
Lina
13 Tuesday Nov 2012
Posted in Hair Stuff, Natural Hair, Style
Tags
Accesories, CurlPlease, Curls, flat iron natural hair, Hair, Love, Natural Hair, Style, Tips
Depending on the region or country you live in, winter can be harsh on natural hair. There’s low humidity (sometimes), and the winter can leave your coils and kinks dry, hard and brittle. I’ve decided to think of some protective styles that I’ll be rocking this winter to protect my marvelous mane…Style 1: Turbans!

Me sweating to death at Mayan ruins in Belize. 🙂 See how I wrapped my turban in my previous post here.
Check out these beauties in turbans!


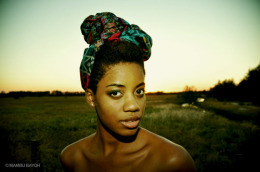


She is gorgeous!
I can’t wait to try these different styles. Turbans are so easy to throw on and are a life saver on bad hair days or just to preserve twists or straightened hair. Although, I wouldn’t be bold enough to rock this at work, this will be a weekend staple for me.
Have a good one!
Lina
30 Tuesday Oct 2012
Posted in Hair Stuff, Natural Hair
Tags
CurlPlease, Curls, Eco Styler, Hair, How To, Love, Natural Hair, Style, weave, Wig
Yes! I am still alive and blogging! 🙂 I have been doing so much ripping and running in the month of October. This month I got in a car accident (not my fault and I’m ok. Thank God!), my mom has been recovering from surgery, Homecoming was this month, and the ever popular Magic City Classic (AAMU vs. ASU) was this month. I am always on the go, which is how I like it, but sometimes it cuts into my blogging and my hair projects that I have going on. Girls just wanna have fun!

In September (YES it’s taken me that long!LOL) I started a project to make myself a wig after visiting a beauty supply store and seeing these cute U-part wigs on the mannequins. I was disappointed when I didn’t see any that would be believable for a Naturalista’s hair texture, so I set out to make my own. Boy oh boy was I astonished at the wonderful results!!!
Here’s What I used:
1 Wig cap, 1 Pack of 12-inch and 1 Pack of 14-inch Milky Way Que Water Weave in color 1B, Weave glue, a Mannequin head, 8 small side combs, scissors, a needle and black thread.

Put the stocking cap on the mannequin head to check the fit and to find out how to position the cap. Leave some slack at the top of the cap (will be cut off at the end) because when the V-Part is cut, it will increase the size of the wig, otherwise it will be too big.
Take the cap back off of the mannequin and put a plastic grocery bag on top of the mannequin head to protect it from the glue and then put the wig cap back on.
Starting in the back with the longer length hair first, measure, cut and glue the tracks to the weave cap and be sure to take your time and set the glue with a blow dryer for each track so that they don’t slip. Don’t glue the tracks on like a bee hive (in a circular motion to the center) or it will be harder to cut the V part and the cap will be weak in the V-part and hard to sew the side combs into.


When you get to the top of the wig, close the part tightly (no scalp showing) with a single track in a U orientation around the slack of the wig cap. Cut the slack of the wig cap off. There will be a small hole at the crown, but that’s ok because you have to cut a part anyway.
At the crown only, camouflage the deepest part of what will be the V-part by cutting hair from the track, dipping it lightly into a dab of glue and placing it on the crown and blow drying it.


See the hole where the slack of the wig cap was cut above.
I used extra track to fill in gaps in the front of the wig where the band of the wig cap is located. You can fill in the wig as you please. At the top of the wig, cut small pieces of track and glue them over the part to add more strength to the part for the sewing the side combs. I did not fluff the wig until I put it on because I didn’t want to over fluff and make it too big.


Carefully cut down the center of the part until you reach the crown. Using a needle and black thread, sew the side combs to the track. You can go around the spine of the comb or in between the eyelets of the comb like I did below. I sewed two combs on each side of the V-part and two combs in the back.


See how the wig gets much bigger after the V-part is cut.
To install the wig, I flat twisted my entire head, separating a front section, and edge sections to the right and left side to be left out.


Used Bobbi pins and fold the ends of the twists up to the roots and pin them down to roots as securely as you can. It doesn’t matter in wich direction you pin them, it will look like this stretching a twist out method.
Leaving the top and edge “leave out” twists free, secure the combs in the V-part around them.


Take down the left out twists. Spray the generously with water and apply Eco Styler olive oil gel to the entire shaft of the hair to blend the leave out with the wig. Part the left out hair as you wish! Enjoy the FIERCENESS!!!


I got soooo many compliments on my hair this weekend from men and women. Everybody thought it was mine! I haven’t taken the wig off since I put it on! LOL! I hope you like it too!
Oh Happy Day!
Lina
24 Monday Sep 2012
Posted in Fashion Fix, Food, Hair Stuff, Natural Hair, Shopping, Style, Vacation
Tags
25, Birthday, Color Blocking, CurlPlease, Curls, Fashion, Hair, Love, Natural Hair, New Orleans, Photos, Pictures, Style, Weekend
I took a trip to New Orleans with good friend Ja’Lissa [who go graciously went with me even though she was under the weather :-)] for my 25th Birthday which is today by the way [insert Birthday cabbage patch :-)]. We had a great time in NOLA, ate some delicious food, took in some great and not so great sites and did a little shopping…

At my apartment before we left…

Headed to Bourbon Street…

Hand Grenades, best drink in NOLA!

Pissed off this alien because I didn’t give him a dollar… eeek!LOL

Got 3 free rides on this mechanical bull! First time ever riding one!

Two seconds later…

Yeah, I was pretty terrible at it. LOL

Saturday morning Breakfast at this great place called Stanley in Jackson Square.

Oops! Wasn’t ready!

That’s more like it!

Delicious corned beef hash, breakfast potatoes and poached eggs with Hollandaise sauce served with french bread! Yummy!

Tons of art on display on Jackson Square…

Can’t remember the name of this church, but nevertheless it was beautiful…

I love Henna Tattoos!

Ja’Lissa at the smoothie stand in the French Market…

The famous and crazy busy Cafe Du Monde!

No food, Beignets ONLY! LOL

One Word. DELICIOUS!

Headed to dinner at Mr. B’s Bistro in the French Quarter! Sorry no pics of the shoes but I am wearing DEBA pumps, I wore them here too.

This is a Bebe body con dress, I got it on sale this past winter. It was my first time wearing it [shopaholic confessions]…

My hair was amazing this weekend. This was a flat twist out with Jamaican Mango & Lime Locking gel, see the post on it here.


Close up!

Ja’Lissa looking fierce with her color blocking skirt and blazer!

Waiting for the Valet…

5 stars for the BBQ Shrimp at Mr. B’s Bistro. It was delicious, the sauce was AMAZING, but it was super messy though. They literally put a bib on you, I even flicked a little bit on my friend Ja’Lissa across the table. LOL. Luckily I had my Tide pen on deck. 🙂

Chocolate Molten Cupcake with Vanilla Bean ice cream, compliments of Mr. B.

Next stop, The Hookah on Decatur Street.


In line waiting to eat breakfast at the delicious Camelia Grill, open since 1946!

The “Who Dats” riding around the French Quarter had me rolling! LOL!


That’s all folks!
Happy Birthday to me!!!!
Lina
07 Friday Sep 2012
Posted in Effortless Style, Fashion Fix, Style
I picked out this cute little get up for lunch with my line sisters one Saturday. I loved this outfit because it was cool, simple and not fussy (mainly because of the oxfords). I love high heels but sometimes you gotta give your feet a break, and this weekend I did.


Scarf Print Shirt- Marshalls; Highwaist shorts-H&M; Oxfords- Not Rated; Owl and Feather earrings- Target
Peace!
Lina
07 Friday Sep 2012
Posted in Hair Routine, Hair Stuff, Natural Hair
Tags
CurlPlease, Curls, Eco Styler, Ecostyler olive oil gel, Hair, Love, Natural Hair, Products, Style, Weekend
On Labor Day I was elated to be off. I woke up slowly and took my time getting ready. It was a nice change from the normal shock of the alarm clock noises. I really wanted to do something new and beautiful with my hair. It all started with a wash n’ go.
I Used Pantene relaxed and natural, sealed with shea oil and let it drip dry for a while, but my hair was still pretty wet. I gathered my hair in to a high pony tail at near the front of my head and found the perfect spot that made my curls fall so perfectly to the front of my head like a bang! I smoothed the edges with Eco Styler Olive oil gel and a hard bristle brush and secured it with my handy-dandy banana clip. Be sure to position the banana clip so that the ends point toward your face (see below). Me and my banana clip are great friends!
I used: Pantene Relaxed&Natural Conditioner (generously as a leave in), Shea Oil (to seal), Ecostyler Olive oil gel (to smooth edges and fly aways), Hard bristle brush (to smooth the front and back), a banana hair clip


I was loving this style can’t you tell!? I have found another go to style besides bunning! YAY! This perfect for the weekends!
Have a good one!
Lina
